Auto exposure
New v2.5.2 feature: Exposure is the amount of light per unit area reaching the surface of the image sensor in the edgertronic camera, measured in units of lux-seconds. Exposure is determined by the shutter speed, lens aperture, and scene luminance. Since the lens aperture and scene luminance can not be controlled by the edgertronic camera, the edgertronic camera auto exposure algorithm can only modifiy the shutter speed.
Auto exposure is valuable in variable lighting situations,for example partly cloudy outdoor.
Enabling auto exposure
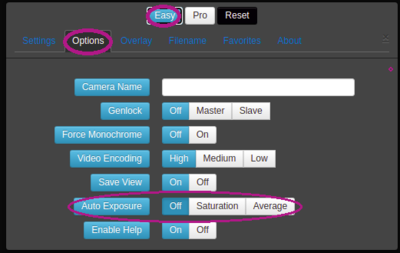
To control the auto exposure setting, click on the wrench to bring up the settings modal, then click on the Options tab. Depending on the software version, you might see either off/on (Figure1) or off/saturation/average (Figure 1, Figure 2). The camera supports several different auto exposure algorithms so you can test to see which works best for your variable lighting conditions. Choose ``Average`` if you are unsure or just getting started.
The Saturation settings adjust shutter speed until about 1% of the pixels are saturated. The saturation settings does not work well at high ISO settings, but is useful for scenes have have lots of white, such as brown bunnies on snow.
The Average setting adjusts shutter speed till the average pixel brightness is 18%, which is the industry standard for scenes with average reflectance (grass, dirt, skin, etc).
Overall, average seems to work better than saturation in most situations and thus should be your first choice.
The most that the exposure time can change, either up or down, between successive frames is approximately 1/8th of an f-stop. If you have a really slow frame rate (200 fps or lower), it can take a second or two for the full adjustment to occur. For typical high speed videography, auto exposure should occur in under a half second.
Auto exposure best practices
Auto exposure will adjust the shutter speed between a maximum of ~1/frame_rate and a minimum of 4us (SC1) or 1.25us (SC2, SC2+, SC2X). The user will need to set the aperture and ISO so that anticipated changes in lighting doesn't cause the auto exposure to bump into either shutter speed limit. While every application is different, you are more likely to hit the limit when lighting decreases, so setting the aperture, ISO and frame rate for the lowest anticipated lighting is often the best option.
Comparing normal exposure and auto exposure
I used a Genaray MonoBright 5200K LED light source set to 10%, 20%, 30%, 40% and 50% of maximum brightness, with auto exposure disable and then again enabled. For each setting, I browsed to http://10.11.12.13/images/image.jpg to capture the live view frame. The results are shown below.
| Lamp Brightness |
Auto Exposure On | Auto Exposure Off |
|---|---|---|
| 50% |  |

|
| 40% |  |

|
| 30% |  |

|
| 20% |  |

|
| 10% |  |

|
CAMAPI support for auto exposure
Both configure_camera() and run() CAMAPI methods support a new dictionary key auto_exposure, which is an enum with the following definition (as found in camconstants.py)
AUTO_EXPOSURE_OFF = 0
AUTO_EXPOSURE_SATURATION = 1
AUTO_EXPOSURE_AVERAGE = 2

